Title: B767 MIP
Post by: Goodenough on January 05, 2018, 03:57:34 PM
Post by: Goodenough on January 05, 2018, 03:57:34 PM
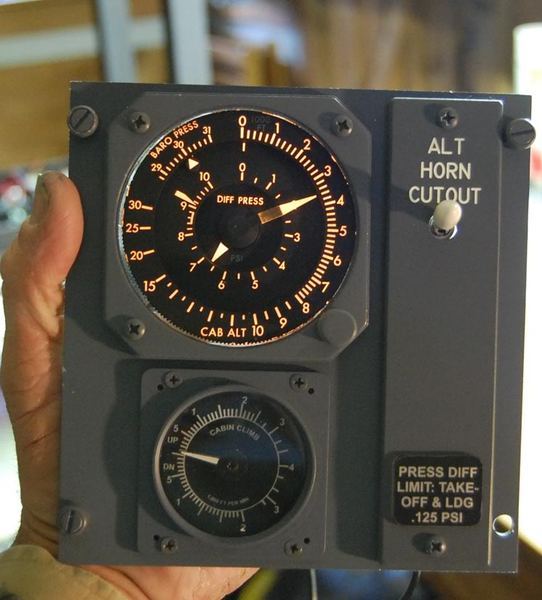
Here are some pics of another project I'm working on. I worked on getting some instruments painted for my B767 MIP. I got these on EBay for cheap and modified them to make them look like the real ones. It took some time with automotive paint and mixing together other paints to achieve a Boeing match. Still need to get the glass face put back in maybe do that this weekend.


Title: Re: B767 MIP
Post by: Trevor Hale on January 05, 2018, 05:06:40 PM
Post by: Trevor Hale on January 05, 2018, 05:06:40 PM
Looks Good Perry, that's one heck of a project.
Title: Re: B767 MIP
Post by: kurt-olsson on January 06, 2018, 03:17:13 AM
Post by: kurt-olsson on January 06, 2018, 03:17:13 AM
Sweeeet! Keep the pictures comin! This is awesome!
Title: Re: B767 MIP
Post by: Goodenough on January 06, 2018, 04:02:36 AM
Post by: Goodenough on January 06, 2018, 04:02:36 AM
Thanks.... I will work on getting more of the MIP populated when more instruments become available. My biggest problem is getting ahead of myself and not taking it slow. I have approx. 80% of the overhead instruments and 50% of the pedestal. Some of the higher price items like airspeed and stand by attitude indicator will have to wait until price comes down which may be awhile. I want to see if a LED strip can fit inside the instruments that you see in the MIP so they light up and if not then under the glare

Title: Re: B767 MIP
Post by: jackpilot on January 06, 2018, 04:29:01 AM
Post by: jackpilot on January 06, 2018, 04:29:01 AM
Quote from: Goodenough on January 06, 2018, 04:02:36 AM
I want to see if a LED strip can fit inside the instruments that you see in the MIP so they light up and if not then under the glare
Those instruments should have internal lighting usually 5V...??
Title: Re: B767 MIP
Post by: Goodenough on January 06, 2018, 05:07:41 AM
Post by: Goodenough on January 06, 2018, 05:07:41 AM
Jack...I modified the RMI and replaced a few things like the broken glass, updated the frame, removed a few things like the internal lights from this unit. Here is a picture of it....is it possible to reinstall and have it work?


Title: Re: B767 MIP
Post by: Trevor Hale on January 06, 2018, 05:15:23 AM
Post by: Trevor Hale on January 06, 2018, 05:15:23 AM
I actually replaced my instrument bulbs with led's. Just find the size you need. I interfaced them with my FS Nav light fsuipc offset. So when the Nav lights go on, so do my instrument lights.
Trev
Trev
Title: Re: B767 MIP
Post by: Goodenough on January 06, 2018, 05:41:59 AM
Post by: Goodenough on January 06, 2018, 05:41:59 AM
Trevor that sounds interesting...I will check it out. I figure its easier to stick with something that I know how to do. Here I bought the LEDS off Amazon and connected it to a power source. Just need help with knowing what the best way is to connect multiple LEDS to one power source and interfacing it with a program like you have. I got the RMI lit....now I need the i struments in the MIP lit.


Title: Re: B767 MIP
Post by: jackpilot on January 06, 2018, 06:59:14 AM
Post by: jackpilot on January 06, 2018, 06:59:14 AM
Not sure about the leds.
The best is to keep it as is ( do not remove lighting) with the 5V bulbs.
I have some real gauges on my MIP and OVH, all with internal OEM lighting.
Just use a relay card and interface it as Trev suggested.
The best is to keep it as is ( do not remove lighting) with the 5V bulbs.
I have some real gauges on my MIP and OVH, all with internal OEM lighting.
Just use a relay card and interface it as Trev suggested.
Title: Re: B767 MIP
Post by: Trevor Hale on January 06, 2018, 09:06:30 AM
Post by: Trevor Hale on January 06, 2018, 09:06:30 AM
Below are two pictures with the devices I use. Same idea as what is in your gauges. Mine just goes on the outside of the gauge.
My interface cards can drive 2 leds on each output. So I just put them in parallel.
The led strips you have are designed for 12V. That will be tricky on your interface.
Jack is right though if your not interfacing your lights and just connecting them to a 5v Switch. His idea is better.


My interface cards can drive 2 leds on each output. So I just put them in parallel.
The led strips you have are designed for 12V. That will be tricky on your interface.
Jack is right though if your not interfacing your lights and just connecting them to a 5v Switch. His idea is better.
Title: Re: B767 MIP
Post by: Goodenough on January 06, 2018, 02:42:44 PM
Post by: Goodenough on January 06, 2018, 02:42:44 PM
OK thanks both of you for your help. I will look at my other three gauges, the clock, altimeter and airspeed and see if I can get the internal lights to work. Is it just a matter of seeing which pin at the back controls the lights.?
As you notice, I'm somewhat technologically challenged
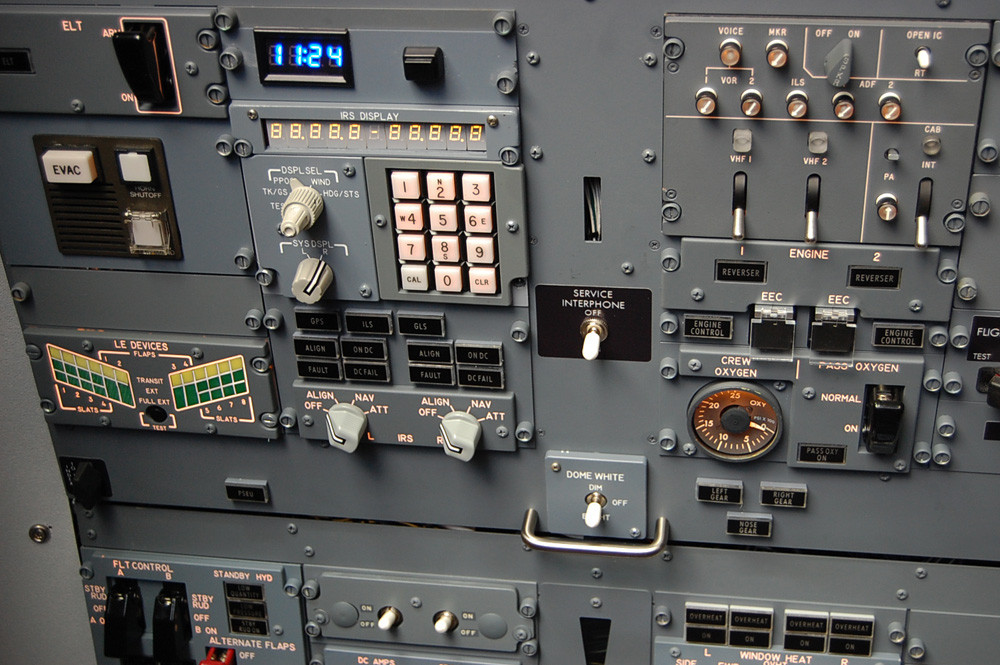
I found the clock on e-bay and the price was a little over $400.00 USD with shipping. A fair price, in my opinion, for a B747 style clock going into a B767

As you notice, I'm somewhat technologically challenged
I found the clock on e-bay and the price was a little over $400.00 USD with shipping. A fair price, in my opinion, for a B747 style clock going into a B767
Title: Re: B767 MIP
Post by: Goodenough on January 06, 2018, 02:48:11 PM
Post by: Goodenough on January 06, 2018, 02:48:11 PM
Here is what it looks like in the panel.

Title: Re: B767 MIP
Post by: 737NGer on January 07, 2018, 05:54:02 AM
Post by: 737NGer on January 07, 2018, 05:54:02 AM
Looking good!
This is what I like to see...when OEM projects make progress lol! ;D
This is what I like to see...when OEM projects make progress lol! ;D
Title: Re: B767 MIP
Post by: Goodenough on January 27, 2018, 09:56:18 AM
Post by: Goodenough on January 27, 2018, 09:56:18 AM
Thanks I have been working on getting the Glare shield out and removing parts from it, now onto sanding all the scratches , and preping for paint. I also got my knobs for the RMI which Im happy to get from Shapeway.


Title: Re: B767 MIP
Post by: kurt-olsson on January 30, 2018, 03:59:18 AM
Post by: kurt-olsson on January 30, 2018, 03:59:18 AM
Man i am so jellous of that real cockpit...
If i was to start again i would go for like a real dc-9 or a md-80 or a 757/767.
The 757 is really a great choice, not as expensive parts as the 737 but in my oppinion just as awesome aircraft.
If i was to start again i would go for like a real dc-9 or a md-80 or a 757/767.
The 757 is really a great choice, not as expensive parts as the 737 but in my oppinion just as awesome aircraft.
Title: Re: B767 MIP
Post by: Goodenough on February 03, 2018, 04:46:34 AM
Post by: Goodenough on February 03, 2018, 04:46:34 AM
Thanks. I want to create a dummy stand for the MIP to work on wiring and screen setup. I'm going to do a cad drawing of the MIP and pedestal stand. Its too cold to work out there now where the cockpit is. The temperature today is -10 and the wind makes it feel like -19. Too coldddd...
Title: Re: B767 MIP
Post by: jackpilot on February 03, 2018, 05:02:24 AM
Post by: jackpilot on February 03, 2018, 05:02:24 AM
Way to go...these little devils are super efficient.
https://www.bmr.co/en/chaufferette-portative-040-1333.html (https://www.bmr.co/en/chaufferette-portative-040-1333.html)
:P
https://www.bmr.co/en/chaufferette-portative-040-1333.html (https://www.bmr.co/en/chaufferette-portative-040-1333.html)
:P
Title: Re: B767 MIP
Post by: kurt-olsson on February 03, 2018, 11:15:37 PM
Post by: kurt-olsson on February 03, 2018, 11:15:37 PM
Haha i also work in a storage that have bad heat in the winter. :)
Right now i am sanding and painting the walls but i know how it feels to play with the simulator in +2 degrees! Hehe
Right now i am sanding and painting the walls but i know how it feels to play with the simulator in +2 degrees! Hehe
Title: Re: B767 MIP
Post by: Goodenough on February 04, 2018, 11:18:12 AM
Post by: Goodenough on February 04, 2018, 11:18:12 AM
Thanks. I may just get me one of those to warm up the place. It doesn't help when you're working on removing a part and can't see because you only see your breath. I'm glad to see others are also working in same conditions. This picture was taken on a warm sunny 23 degree day.

Title: Re: B767 MIP
Post by: Trevor Hale on February 05, 2018, 03:50:44 AM
Post by: Trevor Hale on February 05, 2018, 03:50:44 AM
Quote from: jackpilot on February 03, 2018, 05:02:24 AM
Way to go...these little devils are super efficient.
https://www.bmr.co/en/chaufferette-portative-040-1333.html (https://www.bmr.co/en/chaufferette-portative-040-1333.html)
:P
I tried one of those in my garage... 4000Watt, until I got my first $500.00 Hydro bill for the month LOL
Title: Re: B767 MIP
Post by: jackpilot on February 05, 2018, 04:49:52 AM
Post by: jackpilot on February 05, 2018, 04:49:52 AM
They have to be hooked up to 240V !
Title: Re: B767 MIP
Post by: Trevor Hale on February 05, 2018, 05:30:33 AM
Post by: Trevor Hale on February 05, 2018, 05:30:33 AM
Quote from: jackpilot on February 05, 2018, 04:49:52 AM
They have to be hooked up to 240V !
Mine was LOL
Title: Re: B767 MIP
Post by: Goodenough on February 06, 2018, 04:00:18 PM
Post by: Goodenough on February 06, 2018, 04:00:18 PM
I may have to wait till Spring....when it warms up until then I'm going inside where its warm.

Title: Re: B767 MIP
Post by: Goodenough on February 14, 2018, 03:19:41 PM
Post by: Goodenough on February 14, 2018, 03:19:41 PM
I just found another addition to my MIP panel....a stand by horizon indicator. Eventually will understand how to connect it to a power supply to get it to light up.

Title: Re: B767 MIP
Post by: kurt-olsson on February 15, 2018, 07:14:07 AM
Post by: kurt-olsson on February 15, 2018, 07:14:07 AM
Top notch stuff!
Title: Re: B767 MIP
Post by: Goodenough on March 01, 2018, 03:19:02 PM
Post by: Goodenough on March 01, 2018, 03:19:02 PM
At the end of January, It was decided that the way I would build my B767 MIP stand was to manufacture sheet metal parts thru laser cutting, bending and drilling the pieces. After many drawings and measurements I went ahead with laser cutting the pieces. What I like about this process is the cutting surface is clean of burrs and is very precise. In the pictures I have the manufactured piece that was laser cut next to the Boeing real piece in the MIP frame. I compared each piece to the real ones to see how close the measurements were and I'm very pleased with the 1>1 scale that was achieved. Next powder coating all the pieces before assembly.


Title: Re: B767 MIP
Post by: jackpilot on March 02, 2018, 05:40:43 AM
Post by: jackpilot on March 02, 2018, 05:40:43 AM
Assuming the real shell is yours, what's the point of replicating these parts??
Title: Re: B767 MIP
Post by: Goodenough on March 02, 2018, 06:51:09 AM
Post by: Goodenough on March 02, 2018, 06:51:09 AM
Too cold to work out there. We just got another dump of snow. I need a stand to mount all my panels to it so I can work inside where its toasty warm. Once panels are mounted I can figure out how to connect everything to a power source and computer.
Title: Re: B767 MIP
Post by: Goodenough on March 03, 2018, 03:57:52 AM
Post by: Goodenough on March 03, 2018, 03:57:52 AM
I worked on assembling one of the rudder boxes and it came out not too bad.

Title: Re: B767 MIP
Post by: kurt-olsson on March 03, 2018, 08:15:09 AM
Post by: kurt-olsson on March 03, 2018, 08:15:09 AM
Nice!
Title: Re: B767 MIP
Post by: Goodenough on March 06, 2018, 04:30:14 PM
Post by: Goodenough on March 06, 2018, 04:30:14 PM
I worked on assembling CDU bay and centre monitor frame...now the other side.

Title: Re: B767 MIP
Post by: Goodenough on March 09, 2018, 08:42:23 AM
Post by: Goodenough on March 09, 2018, 08:42:23 AM
Preparing the tray pieces for primer and paint

Title: Re: B767 MIP
Post by: Goodenough on March 10, 2018, 05:58:41 PM
Post by: Goodenough on March 10, 2018, 05:58:41 PM
I assembled another important piece to my MIP.....the sidewall support frame. I used the real one as a reference

Title: Re: B767 MIP
Post by: Goodenough on March 17, 2018, 07:00:37 PM
Post by: Goodenough on March 17, 2018, 07:00:37 PM
Some more pieces of the MIP that was assembled this week. I wanted to place the panels on the frame to make sure it all lined up and it did....whew.


Title: Re: B767 MIP
Post by: Goodenough on March 17, 2018, 07:05:11 PM
Post by: Goodenough on March 17, 2018, 07:05:11 PM
Almost there....now onto the MCP tray and top of frame so I can place the glare shield on. The frame allows me to work on interfacing and connecting everything inside first before it goes into the real cockpit. It will be a SSTD B767

Title: Re: B767 MIP
Post by: Goodenough on March 24, 2018, 07:49:36 AM
Post by: Goodenough on March 24, 2018, 07:49:36 AM
Working on the test fit for MCP before tightening everything up. Next fitting glare shield

Title: Re: B767 MIP
Post by: jackpilot on March 24, 2018, 11:25:13 AM
Post by: jackpilot on March 24, 2018, 11:25:13 AM
A single seat MIP in a real shell !!!?? >:(
Title: Re: B767 MIP
Post by: Goodenough on March 24, 2018, 12:26:35 PM
Post by: Goodenough on March 24, 2018, 12:26:35 PM
Yes but not in the shell. That's another project in its self. The SST is for inside use only where I can experiment and work on getting real gauges/annunciators working.
Title: Re: B767 MIP
Post by: Goodenough on March 29, 2018, 03:33:27 PM
Post by: Goodenough on March 29, 2018, 03:33:27 PM
Well Im happy with the progress so far. Need to start working on my LED LIGHTS. I mounted some near the MCP....its a start.

Title: Re: B767 MIP
Post by: Goodenough on May 11, 2018, 01:13:28 PM
Post by: Goodenough on May 11, 2018, 01:13:28 PM
I had another throttle quadrant and joined it to my homemade stand. I need to start on getting the monitors up for the MIP. I can't decide on what to do next. Information overload.

Title: Re: B767 MIP
Post by: Goodenough on September 06, 2018, 05:04:37 PM
Post by: Goodenough on September 06, 2018, 05:04:37 PM
Building the base to set the single seat B767 MIP on.

Title: Re: B767 MIP
Post by: Goodenough on January 07, 2019, 05:14:20 PM
Post by: Goodenough on January 07, 2019, 05:14:20 PM
Well got the underside panel below glare done and painted an airspeed indicator that came out of an MD-80 aircraft.

Title: Re: B767 MIP
Post by: kurt-olsson on January 07, 2019, 09:23:45 PM
Post by: kurt-olsson on January 07, 2019, 09:23:45 PM
Nice!
Title: Re: B767 MIP
Post by: N606DL on January 16, 2019, 03:12:24 AM
Post by: N606DL on January 16, 2019, 03:12:24 AM
Nice. How do you plan on doing the avionics displays?
Title: Re: B767 MIP
Post by: bernard S on January 16, 2019, 06:18:32 AM
Post by: bernard S on January 16, 2019, 06:18:32 AM
he is lucky because symbol.generators external ..
Title: Re: B767 MIP
Post by: Goodenough on January 16, 2019, 01:17:53 PM
Post by: Goodenough on January 16, 2019, 01:17:53 PM
Thank you Bernard and Kurt for feedback. I appreciate the help Bernard you provided a couple years ago when I built my B747-400 MIP. I have the FS9 software and four 8 " monitors that is connected to a Nvidea 440 PCI graphics card.
Title: Re: B767 MIP
Post by: bernard S on January 16, 2019, 04:41:04 PM
Post by: bernard S on January 16, 2019, 04:41:04 PM
lol now you opened can of worms ..
Title: Re: B767 MIP
Post by: Goodenough on January 16, 2019, 05:13:23 PM
Post by: Goodenough on January 16, 2019, 05:13:23 PM
Well youre probably right so I am going do it. Here is what I have for my rig.
CPU: Intel Core 2 Quad Q6600
Power Supply: 430 watt ThermalTake
RAM:8 GB (4 x 2 GB) DDR2 PC6400 operating in dual channel mode.
Boot drive: 120 GB Kingston SSD
Data drive: 500 GB Western Digital SATA
Optical drive: LG Super Multi DVD burner.
I installed Windows 7 and everything runs smoothly.
I tore open an old joystick and ripped oit tje guts. Im going to use the potentiometers for my yoke and throttles. I got a friend helping me connect them
Title: Re: B767 MIP
Post by: jackpilot on January 17, 2019, 05:21:04 AM
Post by: jackpilot on January 17, 2019, 05:21:04 AM
Quote from: Goodenough on January 16, 2019, 05:13:23 PM
I tore open an old joystick and ripped oit tje guts. Im going to use the potentiometers for my yoke and throttles. I got a friend helping me connect them
I would buy good quality (high res,) pots to that end, recycling joystick pots can result in sub-par performance to say the least.
My 2 cts
Title: Re: B767 MIP
Post by: Goodenough on January 17, 2019, 02:30:34 PM
Post by: Goodenough on January 17, 2019, 02:30:34 PM
Thanks Jack....never considered that. Im hearing now people use magnets instead of potentiometers. . Anyone here how that works,
Also I downloaded FS9 and LEVEL D B767 on my computer with a addon that Matt suggested called FS panel studio so that the panels I want can be exported to the four 8" monitors that I got. Anyways I will be working on this for a while. I am following John's (blueskydriver) advise and will avoid the trend to always upgrade or change PC's....like he says chasing the Flight Simulator Rainbow....which is good on the pocketbook .
Also I downloaded FS9 and LEVEL D B767 on my computer with a addon that Matt suggested called FS panel studio so that the panels I want can be exported to the four 8" monitors that I got. Anyways I will be working on this for a while. I am following John's (blueskydriver) advise and will avoid the trend to always upgrade or change PC's....like he says chasing the Flight Simulator Rainbow....which is good on the pocketbook .
Title: Re: B767 MIP
Post by: jackpilot on January 17, 2019, 04:41:47 PM
Post by: jackpilot on January 17, 2019, 04:41:47 PM
Quote from: Goodenough on January 17, 2019, 02:30:34 PM
Im hearing now people use magnets instead of potentiometers. . Anyone here how that works,
Google Hall effect
Title: Re: B767 MIP
Post by: Goodenough on November 16, 2019, 09:48:27 AM
Post by: Goodenough on November 16, 2019, 09:48:27 AM
For sale B767 single seat homebuilt.


